 Switch to New Zealand
IMPORTANT: Please ensure you check with your local Council regarding specific perimeter and pool fence requirements before installing your fence.
Please check for underground services (electricity, gas, water, telephone etc) before digging. For Australia contact ‘Before You Dig Australia’ at www.byda.com.au or dial 1100. For New Zealand contact ‘Before You Dig’ at www.beforeudig.co.nz or dial 0800 248 344.
WHAT YOU WILL NEED: Tape Measure, Pencil, Spirit Level, String-line, Post Hole Digger, Shovel, Drill, Angle Grinder or Hacksaw, Cement Mixer or Wheelbarrow, Safety Clothing & Equipment
Step 1 Mark out and dig holes
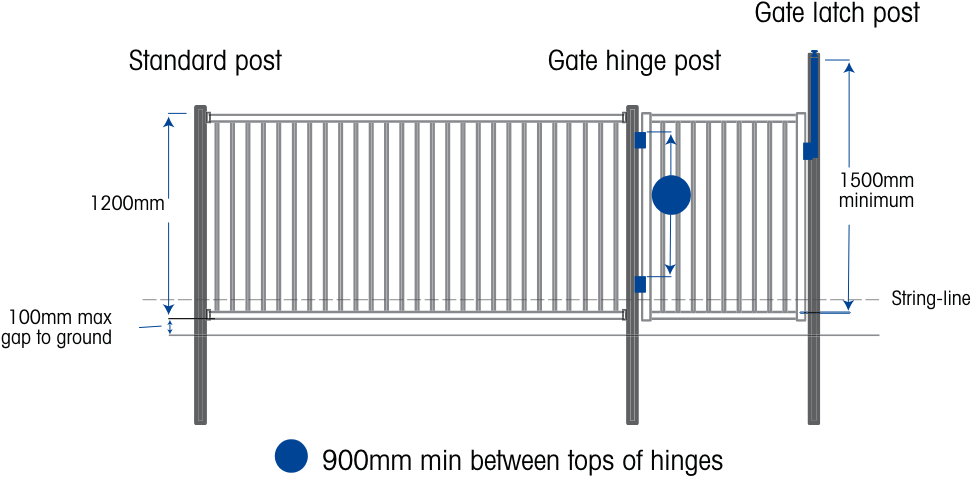
- Determine the position of the fence. Set up a string-line along the fence-line. Ensure you keep it an even distance above the ground and as low as possible.
- Mark out the post holes along the string-line using a tape measure. Mark the position of the centres of the posts and allow for the width of posts and the fence or gate panel.
- Dig the holes for the posts approx 200mm diameter x 600mm deep. Note that corner, end and gate post holes should be wider at the bottom for added strength.
Pool Fence Installation
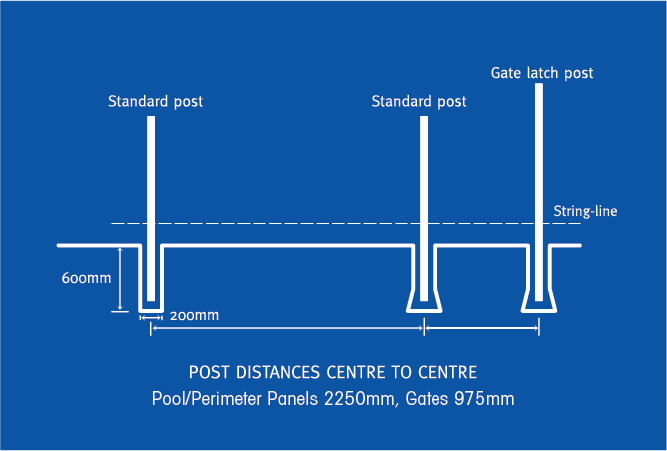
Notes: Flanged posts have a 4 hole flange welded to the base for fixing to a solid ground material. For pool fences, gate latch posts are longer to suit installation of a top pull safety latch to meet Pool Fencing Regulations.
Step 2 Install the posts
- Calculate the distance from the string-line to the top of the post and mark the post with a chalk. Allow for 50 to 80mm below the fence panels and 10 to 30mm above the fence panels to the top of the post. Pool gate latch posts should extend 300mm above the top of the gate. Don’t forget to allow for the step if the ground is sloping and the fence panels are to be stepped (Please check Council Regulations on stepping panels).
- Prepare concrete mix in a cement mixer or wheelbarrow. Fill the post hole halfway, then insert the post ensuring that the spacing and height are correct and that the post is vertical, using a spirit level.
- It is not recommended to use a fast setting concrete to allow time to adjust posts to correct height, levels & square.
- Fill the rest of the hole around the post to just above the ground level. Ensure the cement level slopes away from the post. Poke the mix with a trowel to remove air bubbles and ensure a solid fill. Re-check the height and alignment of the post.
- Using a damp sponge, clean the bottom of the posts before the concrete sets.
- Let the concrete set overnight to allow the post to bear weight before fixing panels and gates.
Step 3 Install the fence panels & gates

- Fix the panels to the posts with panel brackets and self-drilling screws. Use spare screws to screw through the bottom of the brackets up into the panel top rail to secure the panel tightly if needed.
- Non-standard length panels can be cut to length with a hack saw or an angle grinder with a cut-off wheel. Touch up cut ends with a Touch-Up Pen or spray can.
- Fix hinges & Tri-latch to gates & fix to posts, ensuring the gate is at the correct height and swinging the correct way (away from the pool). Ensure hinges are minimum 900mm apart, and the latch is a minimum 1500mm above the bottom rail.
Pool hinges and latches sold separately. We recommend using pool compliant gate hardware and latches, refer to your local council.
- Test the gate to ensure that it self-closes from any position. Adjust the spring tension on the hinges as manufacturers instructions.
- Install 2-part cover by screwing together.
- Please ensure you brush and clean up all metal filings or shavings from all cuts, scratches or drilling locations. It is recommended to seal any scratches, cuts or drill holes with a protective coating to prevent further rusting.
- Once you have completed your installation, remove the protective plastic covering on all components as soon as possible to avoid the plastic degrading in the weather and making it difficult to remove.
Specs for pool safety compliance
Exceeds Australian standards AS1926.1-2012
Everything you need to build your fence
Simply choose the components required to assemble and install your fence. Make sure you choose all components from the same system.

